
Tentang Drupal
Drupal adalah sistem manajemen konten open source terkenal yang berbasis PHP. Ini tersedia secara gratis dan dirilis di bawah Lisensi Publik Umum GNU. Drupal dapat digunakan untuk semua ukuran situs web, dari situs web internasional besar hingga blog pribadi dan situs perusahaan atau pemerintah. Bagian inti drupal diberi nama “Drupal Core”, berisi sistem manajemen konten dasar, manajemen pengguna, manajemen menu, penyesuaian tata letak dan administrasi sistem, sampai sekarang, komunitas drupal telah menyediakan lebih dari 31.000 modul untuk Drupal.
Prerequisites
- Ubuntu 16.04 - 64bit version.
- Root privileges.
Install dan Konfigurasi Nginx
Step 1 - Update the Ubuntu system
Login to the ubuntu server with ssh, then become root user and update the ubuntu repository:1
2sudo su
sudo apt-get updateStep 2 - Install Nginx and PHP-FPM
Nginx atau “engine-x” adalah server HTTP cepat yang fokus pada kinerja tinggi dengan penggunaan memori / RAM yang rendah. Kita dapat menggunakan Nginx juga sebagai proxy terbalik, untuk protokol HTTP, HTTPS, POP3 dan IMAP. Dalam tutorial ini, kita akan menggunakan Nginx sebagai server HTTP SSL yang diaktifkan.
Instal Nginx dengan perintah berikut, sebagai sudo / pengguna root:1
sudo apt-get install nginx -y
Selanjutnya, instal php7.1-fpm dengan ekstensi php-gd yang diperlukan oleh inti drupal:
1
2
3
4
5
6sudo apt-get install software-properties-common
sudo add-apt-repository ppa:ondrej/php
sudo apt-get update
sudo apt-get install php7.1
sudo apt-cache search php7.1
sudo apt-get install php7.1 php7.1-cli php7.1-common php7.1-json php7.1-opcache php7.1-mysql php7.1-mbstring php7.1-mcrypt php7.1-zip php7.1-fpm php7.1-pgsql php7.1-xml php7.1-gd php7.1-cgi php7.1-cli php7.1-curl -yStep 3 - Configure Nginx and PHP-FPM
Pada langkah ini, kita akan mengkonfigurasi Nginx untuk menggunakan php-fpm untuk melayani permintaan HTTP untuk halaman PHP. Masuk ke direktori php-fpm “/etc/php/7.1/fpm” dan edit file “php.ini”:1
2cd /etc/php/7.1/fpm
pico php.iniDalam baris ke 761, uncomment baris cgi.fix_pathinfo ganti value ke “0”.
1
cgi.fix_pathinfo=0
Simpan file and exit dari editor.
Sekarang kita modifikasi konfigurasi virtual host Nginx default. Edit file “default” dan aktifkan php-fpm.1
pico /etc/nginx/sites-available/default
Uncomment baris 51 - 58 to use php-fpm with nginx.
1
2
3
4
5
6
7
8location ~ \.php$ {
include snippets/fastcgi-php.conf;
#
# # With php7.1-cgi alone:
# fastcgi_pass 127.0.0.1:9000;
# # With php7.1-fpm:
fastcgi_pass unix:/run/php/php7.1-fpm.sock;
}Simpan file and exit.
Kemudian uji konfigurasi Nginx dengan perintah “nginx -t” untuk memastikan bahwa konfig kita sudah benar:1
nginx -t
Jika tidak ada kesalahan, restart nginx dan layanan php-fpm:
1
2/etc/init.d/nginx restart
systemctl restart php7.1-fpmStep 4 - Configure the VirtualHost for Drupal
Kita akan menginstal Drupal 8 di direktori “/htdocs/drupal/drupal8” dengan nama domain “drupal8.local”. Silakan ganti nama domain di instalasi Anda dengan nama domain dari situs web yang ingin Anda gunakan untuk instalasi drupal ini. Pertama kita buat direktori:1
2mkdir -p /htdocs/drupal/drupal8
pico /etc/nginx/sites-available/drupal8Paste konfigurasi Nginx untuk drupal di bawah ke dalam file drupal8:
1
2
3
4
5
6
7
8
9
10
11
12
13
14
15
16
17
18
19
20
21
22
23
24
25
26
27
28
29
30
31
32
33
34
35
36
37
38
39
40
41
42
43
44
45
46
47
48
49
50
51
52
53
54
55
56
57
58
59
60
61
62
63
64
65
66
67
68
69
70
71
72
73
74
75
76
77
78
79
80server {
server_name drupal8.local;
root /htdocs/drupal/drupal8; ## <-- Your only path reference.
listen 80;
listen [::]:80;
listen 443 default ssl;
ssl_certificate /etc/nginx/ssl/drupal.crt;
ssl_certificate_key /etc/nginx/ssl/drupal.key;
# Redirect HTTP to HTTPS
if ($scheme = http) {
return 301 https://$server_name$request_uri;
}
location = /favicon.ico {
log_not_found off;
access_log off;
}
location = /robots.txt {
allow all;
log_not_found off;
access_log off;
}
location ~ \..*/.*\.php$ {
return 403;
}
location ~ ^/sites/.*/private/ {
return 403;
}
# Block access to "hidden" files and directories whose names begin with a
# period. This includes directories used by version control systems such
# as Subversion or Git to store control files.
location ~ (^|/)\. {
return 403;
}
location / {
# try_files $uri @rewrite; # For Drupal <= 6
try_files $uri /index.php?$query_string; # For Drupal >= 7
}
location @rewrite {
rewrite ^/(.*)$ /index.php?q=$1;
}
# In Drupal 8, we must also match new paths where the '.php' appears in the middle,
# such as update.php/selection. The rule we use is strict, and only allows this pattern
# with the update.php front controller. This allows legacy path aliases in the form of
# blog/index.php/legacy-path to continue to route to Drupal nodes. If you do not have
# any paths like that, then you might prefer to use a laxer rule, such as:
# location ~ \.php(/|$) {
# The laxer rule will continue to work if Drupal uses this new URL pattern with front
# controllers other than update.php in a future release.
location ~ '\.php$|^/update.php' {
fastcgi_split_path_info ^(.+?\.php)(|/.*)$;
#NOTE: You should have "cgi.fix_pathinfo = 0;" in php.ini
include fastcgi_params;
include snippets/fastcgi-php.conf;
fastcgi_param SCRIPT_FILENAME $request_filename;
fastcgi_intercept_errors on;
fastcgi_pass unix:/run/php/php7.1-fpm.sock;
}
# Fighting with Styles? This little gem is amazing.
# location ~ ^/sites/.*/files/imagecache/ { # For Drupal <= 6
location ~ ^/sites/.*/files/styles/ { # For Drpal >= 7
try_files $uri @rewrite;
}
location ~* \.(js|css|png|jpg|jpeg|gif|ico)$ {
expires max;
log_not_found off;
}
}Simpan file and exit the editor.
File virtual host Drupal telah dibuat, sekarang kita harus mengaktifkannya dengan membuat symlink ke file di direktori “sites-enabled”:1
ln -s /etc/nginx/sites-available/drupal8 /etc/nginx/sites-enabled/
Test Nginx configuration dan restart Nginx:
1
2nginx -t
/etc/init.d/nginx restart
Install dan Konfigurasi Drupal
Step 1 Install Drupal Console
Drupal Console adalah seperangkat alat yang dijalankan dari antarmuka baris perintah (CLI) untuk menghasilkan kode boilerplate dan berinteraksi dengan instalasi Drupal 8. Ini adalah alat penting bagi siapa pun yang menulis kode untuk Drupal.1
2
3
4sudo apt-get install curl
curl https://drupalconsole.com/installer -L -o drupal.phar
mv drupal.phar /usr/local/bin/drupal
chmod +x /usr/local/bin/drupalInstall drupal console via composer
1
composer update drupal/console --with-dependencies
Step 2 Download dan Install drupal8
Download dan Install drupal8 via wget
Masuk ke direktori drupal8 yang kita buat sebelumnya dan unduh Drupal dengan wget atau drupal console. Saya akan menggunakan wget di sini:1
2
3
4
5cd /htdocs/drupal/drupal8
wget https://ftp.drupal.org/files/projects/drupal-8.1.10.tar.gz
tar -xzvf drupal-8.1.10.tar.gz
mv drupal-8.1.10/* .
rm -rf drupal-8.1.10Pada langkah berikutnya, kita akan mengkonfigurasi file pengaturan Drupal. Dari direktori utama Drupal, masuk ke direktori “sites/default” dan salin dua file konfigurasi “settings.php” dan “services.yml”:
1
2
3cd sites/default
cp default.settings.php settings.php
cp default.services.yml services.ymlKemudian kita harus membuat direktori baru dengan nama “files” di dalam direktori “sites/default”. Perintah “chmod” memastikan bahwa file konfigurasi dan direktori “files” dapat ditulis untuk instalasi Drupal:
1
2mkdir files/
chmod a+w *Sekarang kita buka situs Drupal (dalam kasus saya http://drupal8.local) dengan Browser web,
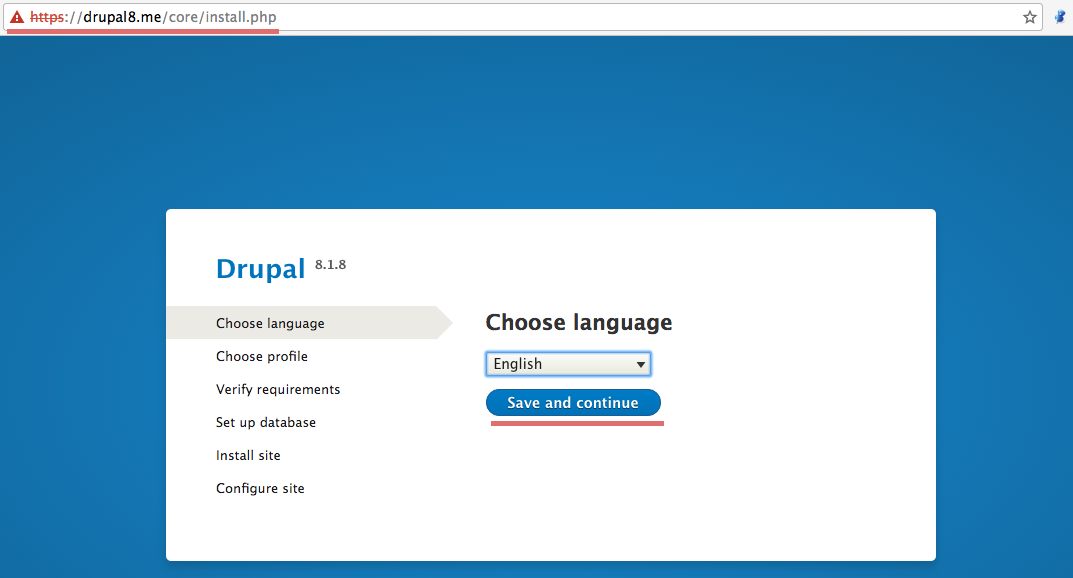
Pilih Bahasa, saya pilih “English” disini.
Click “Save and continue”.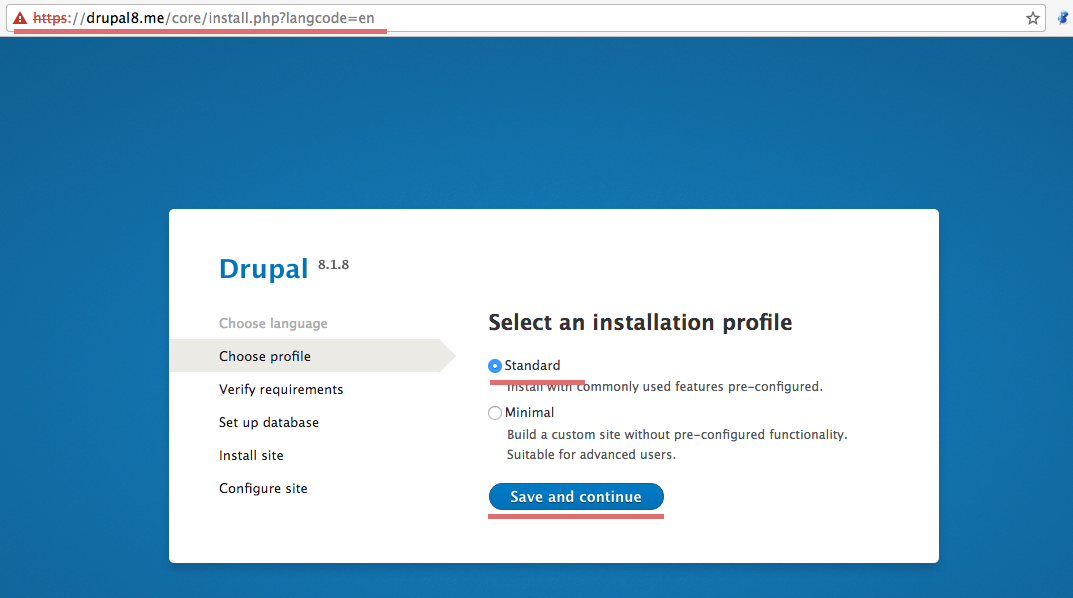
Pilih installation type. kita dapat memilih standard atau minimal type. Saya pilih “Standard”
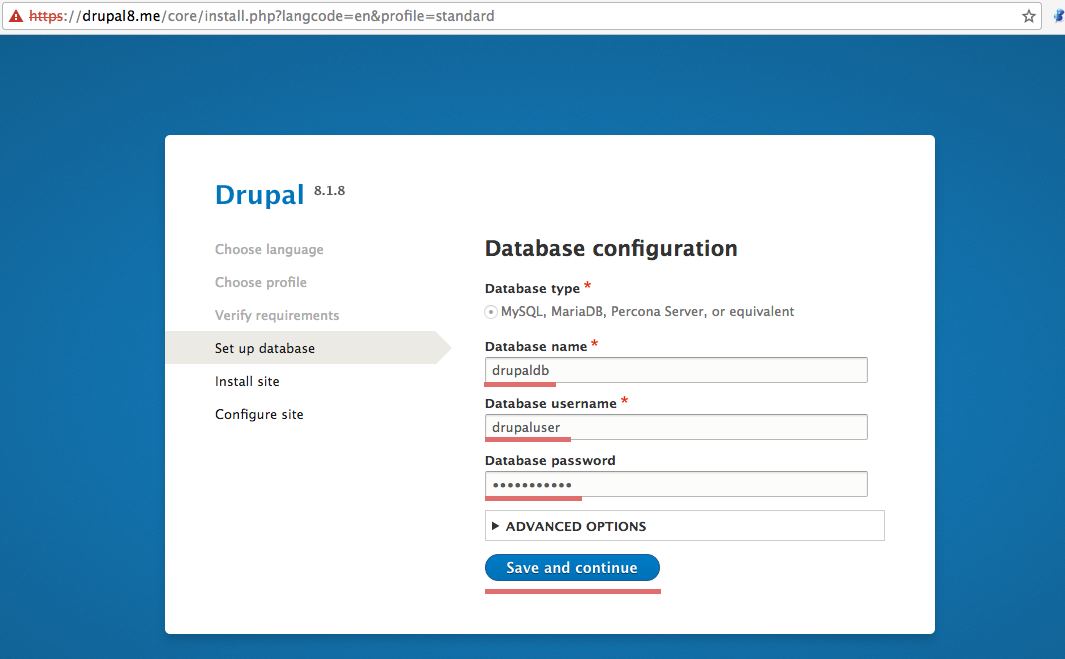
Sekarang kita masuk halaman konfigurasi database. Isi rincian basis data untuk database yang kita buat untuk Drupal.
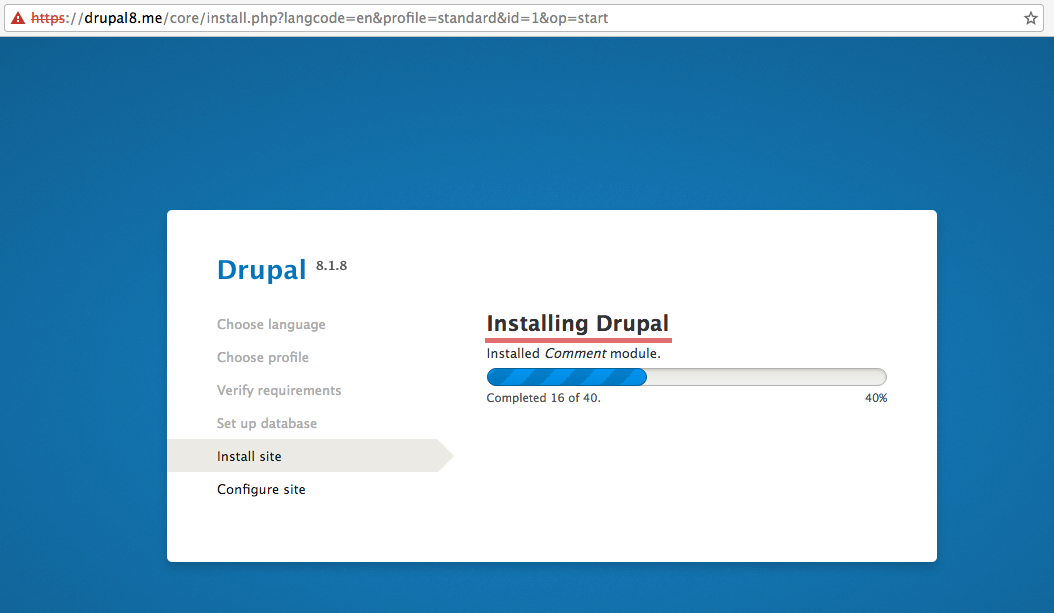
Tunggu installation sampai selesai.
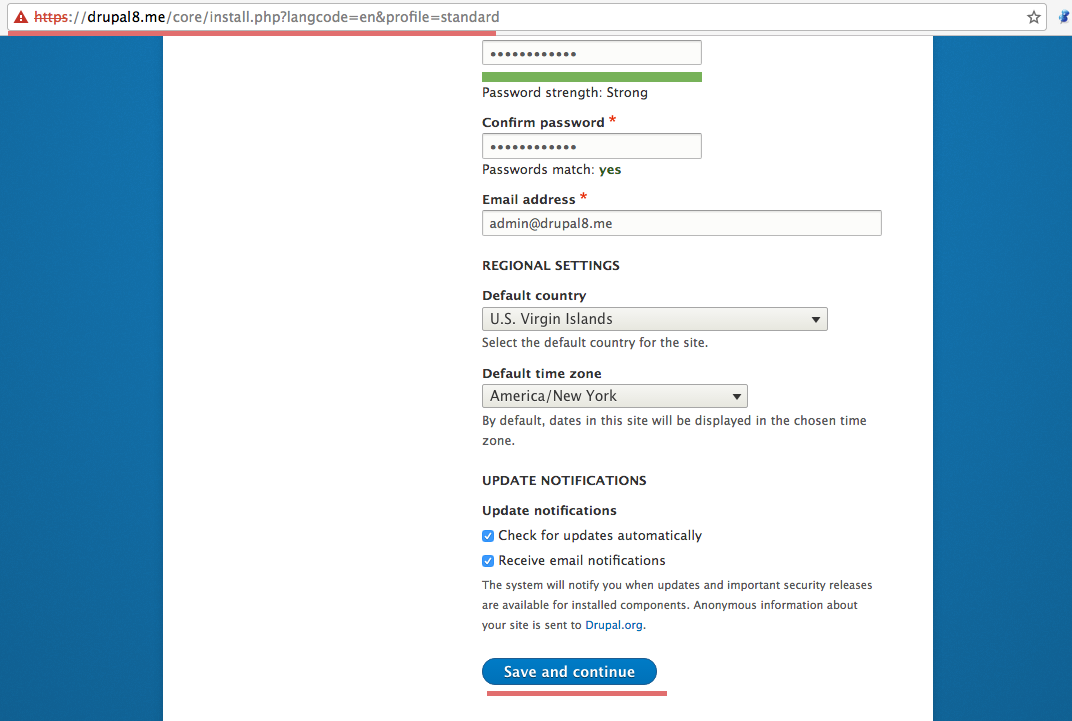
Sekarang kita harus mengkonfigurasi pengaturan profil situs seperti nama situs, pengguna, dan kata sandi untuk admin, alamat email dll.

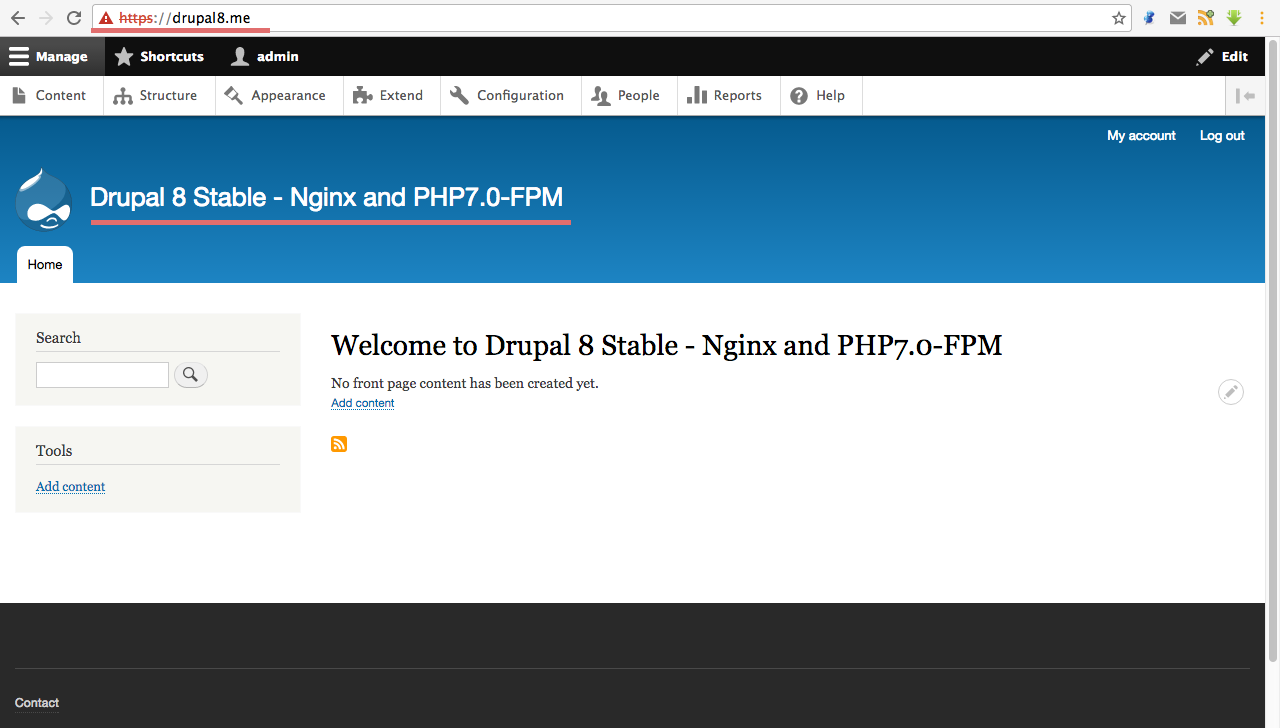
Drupal sudah terinstall, kita akan di redirect ke Drupal home page.
Download dan Install drupal8 via drupal console
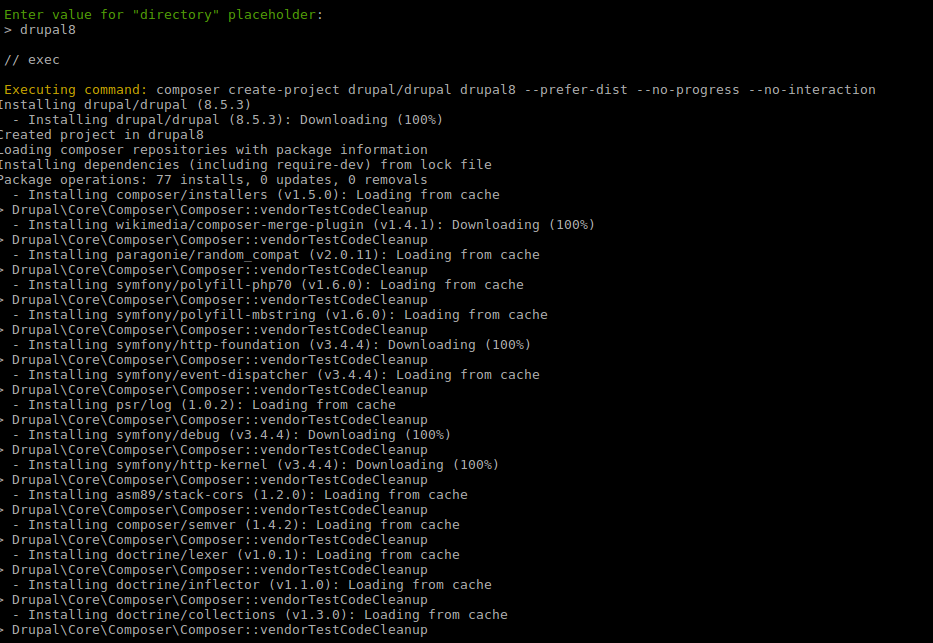
Drupal Console menyediakan lebih dari satu metode untuk download dan instal Drupal 8. Dalam posting ini saya akan mencantumkan langkah-langkah untuk mencapai proses instalasi.1
drupal site:new



Site Install
1
2
3
cd drupal8 (nama folder instalasi)
composer require drupal/console:~1.0 --prefer-dist --optimize-autoloader
drupal site:install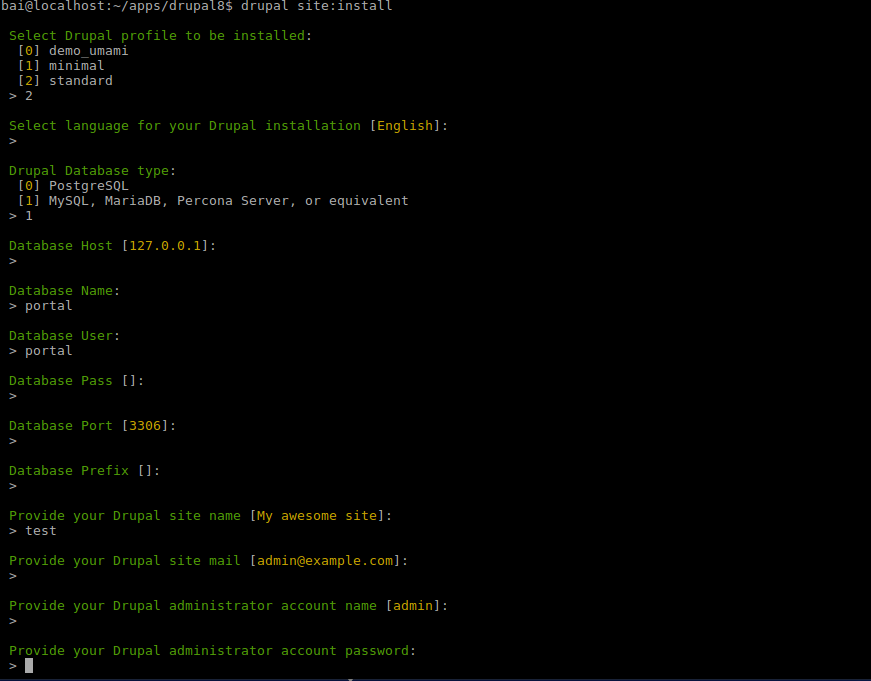
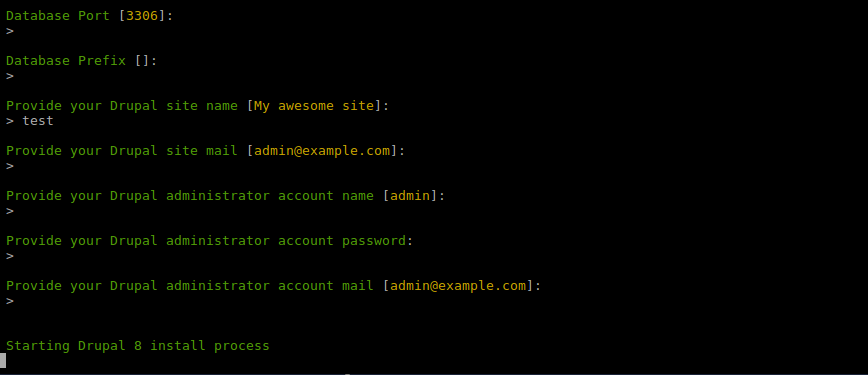
Tunggu sampai proses instalasi selesai, selanjutnya buka browser ( http://drupal.local)

Drupal sudah terinstall, kita akan di redirect ke Drupal home page.
Selamat Mencoba, semoga berhasill…